

Hướng dẫn nhanh
DOWNLOAD
Access the DPT3Care website by using the credentials provided by DPT.
Select the Download tab and download the release of ThinkDesign you are interested in.
INSTALL
To extract all files from the downloaded .iso file:
a. In Windows 10, simply right-click on the .iso file and Open it with Windows File Explorer.
b. In Windows 7, you can use the utility program 7zip (free download).
Run the DPT_TD_Setup.exe you will find in the folder where all extracted files are.
Follow the steps of the Setup Wizard and complete the installation.
After running the program and the “Valid license not found” error message, you will be redirected to the Sentinel Admin Control Center (ACC), https://localhost:1947.
During the installation, a .c2v (Customer-to-Vendor) file is created on your Desktop. The file will be named after your machine plus a code number, for example: XXXXXX_110137.c2v.
ACTIVATE
Now send the file to pwdrelease@dptcorporate.com.
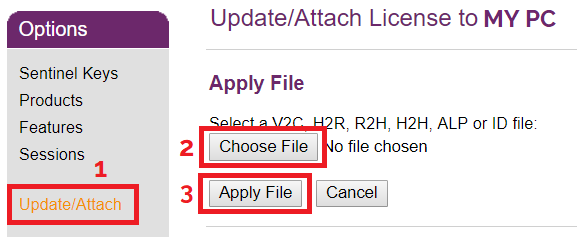
You will then receive a .v2c (Vendor-to-Customer) file, which needs to be applied to the “Update/Attach” section in the Sentinel ACC (https://localhost:1947).
Hướng dẫn chi tiết
DOWNLOAD
Access the DPT3Care website by using the credentials provided by DPT.
Select the Download tab and download the release of ThinkDesign you are interested in.
INSTALL
To extract all files from the downloaded .iso file:
a. In Windows 10, simply right-click on the .iso file and Open it with Windows File Explorer.
b. In Windows 7, you can use the utility program 7zip (free download).
Run the DPT_TD_Setup.exe you will find in the folder where all extracted files are.
Follow the steps of the Setup Wizard and complete the installation.
When requested
– for enabling TDViewerPlus, TDDrafting, TDBase, TDEngineering and TDEngineeringPlus, choose the Typical installation and keep following the on-screen instructions;
– for enabling TDTooling, TDMolding, TDSyling and TDProfessional, choose the Custom installation, select all the listed modules except for the Ansys ones and keep following the on-screen instructions.
After running the program and the “Valid license not found” error message, you will be redirected to the Sentinel Admin Control Center (ACC), https://localhost:1947.
To activate a license, you need first to generate the .c2v (Customer-to-Vendor) file.
OPTION A
If you downloaded ThinkDesign 2018 or a successive version, during the installation, a .c2v file is automatically created on your Desktop. The file will be named after your machine plus a code number, for example: XXXXXX_110137.c2v.
OPTION B
If you installed a prior version (2015-2017), proceed as follows.
Run as Administrator the executable file DPTGetC2V.exe that is in the installation folder of ThinkDesign (ex: C:\program files\think3\thinkdesign 2016\common\utilities).
A command shell window will appear indicating the folder where the .c2v file has been saved, which usually is the “Temp” folder.
[ If you have difficulty in finding the .c2v file, just click “Start” and select the “Run” command.
A dialog box with a search bar will appear, type “%temp%” and then click “Ok”.
In this way, the “Temp” folder will open. Sort files by the last modified.
The first file on the list will be the .c2v file you are looking for. ]
ACTIVATE
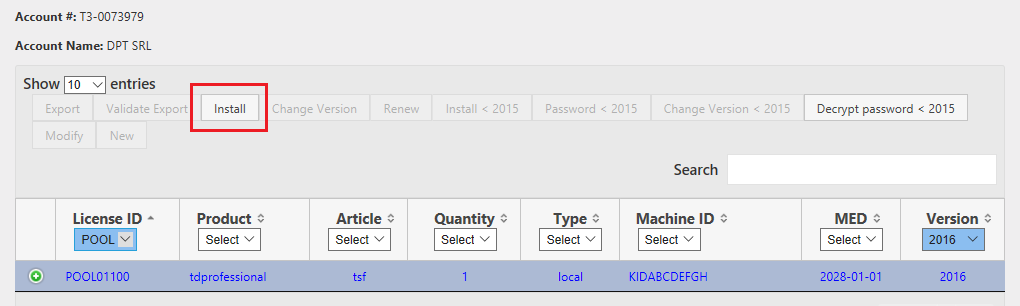
In the Licenses tab of the DPT3Care website, select the row of the license to be activated (do NOT click the green cross button, but the row itself), and click the Install button in the Command bar.
A new tab will open (attention: you need to allow pop-ups!). Scroll down, click on Browse, select the previously generated .c2v file to upload and press the Submit button.
You will then receive a .v2c (Vendor-to-Customer) file, which needs to be applied to the “Update/Attach” section in the Sentinel ACC (https://localhost:1947).
… AND CHANGE VERSION
From the Download section of the DPT3Care website, download the release of ThinkDesign you are interested in.
Go back to the Licenses tab, select the row of the license you want to update (do NOT click the green cross button, but the row itself), and click the Change Version button in the Command bar.

After selecting the version you’d like to use, press Ok.
You will then receive a .v2c (Vendor-to-Customer) file, which needs to be applied to the “Update/Attach” section in the Sentinel ACC (https://localhost:1947).
Get the latest news and updates from the ThinkDesigners community!
